GatsbyでMDX形式の記事を扱えるようにするための手順メモです。
今回は gatsby-plugin-mdx が組み込まれた starter は使いません。 クリーンな状態から初めて最低限の記述で動作させることを目指します。
1.プロジェクト作成
最初に gatsby-starter-hello-world を使って新規プロジェクト作成します。
gatsby new mdx-example https://github.com/gatsbyjs/gatsby-starter-hello-world
cd mdx-example
2.プラグインの組み込み
gatsby-plugin-mdx を実行するために必要なプラグインをインストールします。
npm install gatsby-plugin-mdx @mdx-js/mdx @mdx-js/react gatsby-source-filesystemgatsby-config.js に gatsby-plugin-mdx と gatsby-source-filesystem のプラグイン設定を行います。
module.exports = {
  plugins: [
    `gatsby-plugin-mdx`,
    {
      resolve: `gatsby-source-filesystem`,
      options: {
        path: `src/posts`,
        name: `posts`
      }
    },
  ],
}- gatsby-plugin-mdx に関しては、とりあえずオプションなしにしてます。 オプション等の詳細は gatsby-plugin-mdx のドキュメント を参照してください。
- gatsby-source-filesystem の path で指定した
src/postsは mdx ファイルの格納場所です。
3.gatsby-node.jsの作成
トップディレクトリに gatsby-node.js を作成し、createPages ファンクションを記述します。
今回は「src/templates/blog-post.js ファイルをひな型として記事を作成する」という形にしています。
const path = require("path")

exports.createPages = async ({ actions, graphql, reporter }) => {
  const { createPage } = actions

  const blogPostTemplate = path.resolve(`src/templates/blog-post.js`)

  const result = await graphql(`
    {
      allMdx {
        edges {
          node {
            frontmatter {
              title
              slug
            }
          }
        }
      }
    }
  `)

  if (result.errors) {
    reporter.panicOnBuild(`Error while running GraphQL query.`)
    return
  }

  result.data.allMdx.edges.forEach(({ node }) => {
    createPage({
      path: node.frontmatter.slug,
      component: blogPostTemplate,
      context: {
        slug: node.frontmatter.slug,
      }
    })
  })
}
4.src/templates/blog-post.jsの作成
記事のひな型となる src/templates/blog-post.js ファイルを作成します。
import React from "react"
import { graphql } from "gatsby"
import MDXRenderer from "gatsby-plugin-mdx/mdx-renderer"

const Blog = ({ data }) => (
  <>
    <h1>{data.mdx.frontmatter.title}</h1>
    <hr/>
    <MDXRenderer frontmatter={data.mdx.frontmatter}>{data.mdx.body}</MDXRenderer>
  </>
)
export default Blog

export const pageQuery = graphql`
  query BlogPostBySlug($slug: String!) {
    mdx(frontmatter: { slug: { eq: $slug } }) {
      body
      frontmatter {
        title
        slug
      }
    }
  }
`- 一度辛い目にあったので、MDXRenderer の frontmatter 属性は明示的に設定してます。
- ちなみに
src/postsではなくsrc/pagesを利用する場合は、MDXRenderer タグを書いてしまうとページ作成が2回実行されるという落とし穴があるので要注意: https://github.com/gatsbyjs/gatsby/issues/25185#issuecomment-647367850
4.記事をMDXで書く
src/posts フォルダの下に一つフォルダを作ってその下に index.mdx という名前でファイルを作ります。
(例: src/posts/2021-04-17-test1/index.mdx)
---
slug: "test1"
title: "テスト"
---
テストだよ

* <div>1+1={1+1}</div>
* <div>slug: {props.frontmatter.slug}</div>
* <div>title: {props.frontmatter.title}</div>
5.動作確認
起動します。
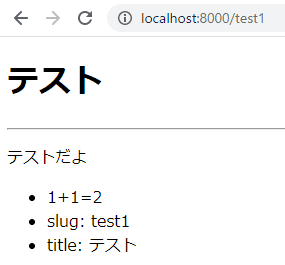
gatsby develop起動できたら、ブラウザで http://localhost:8000/[slug] (例: http://localhost:8000/test1)にアクセスします。

無事表示できました。
コード全体は GitHub にアップしました: